15 The advanced editor
The advanced editor is a second way to play the virtual FM-1. It shows everything the panel hides behind its pages: every parameter of a sound at once, the whole signal flow, the modulation rack and its cables, and what each choice would cost in memory before you make it. It does not replace the panel. It edits the same instrument, so a knob turned on the panel moves its slider in the editor, and a slider moved in the editor opens that page on the panel.
In the simulator
The editor runs in the browser simulator, beside the panel or in its place. It edits what the simulator plays and nothing else: it never sends anything to a MIDI device, and nothing in it reaches an FM-1.
15.1 Opening the editor
Status:In the simulator
The switch at the top of the page has three positions. Panel is the panel alone. Workbench puts the panel and the editor together. Editor gives the editor the whole page and shows the FM-1’s screen in a small card beside it, headed On the FM-1, so you can see what the panel shows while you work. Power the simulator on first; until then the editor says so.
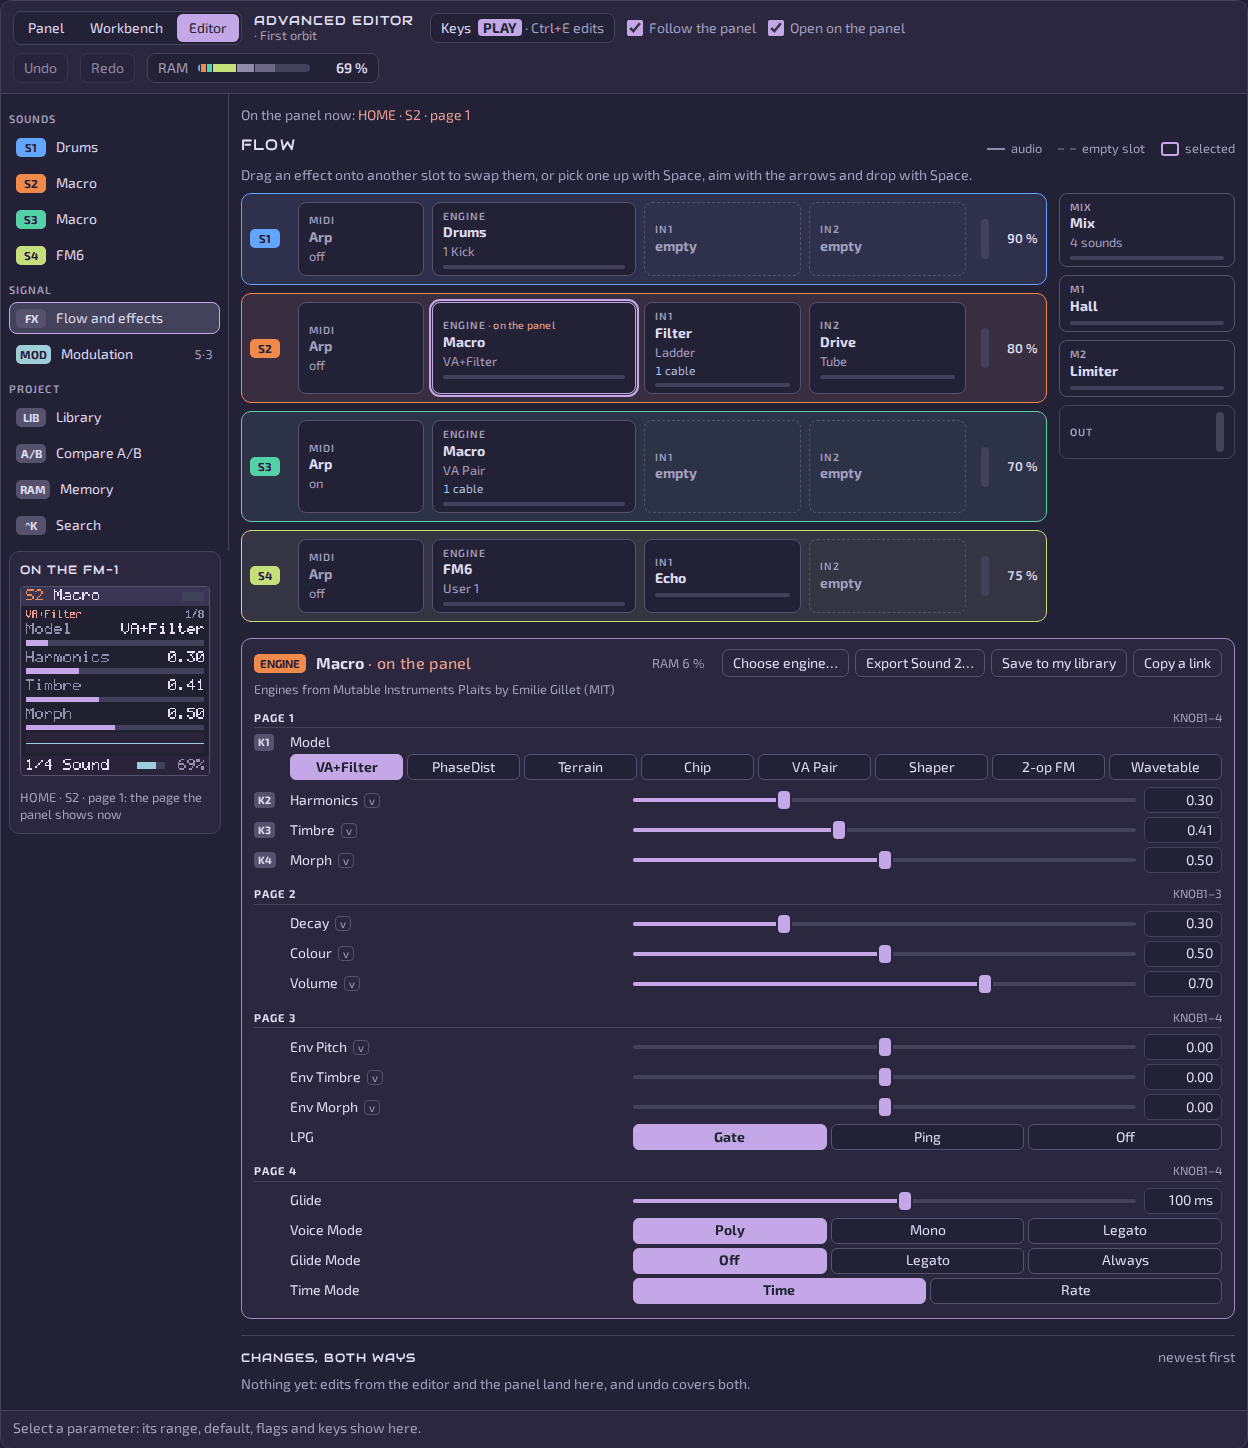
Along the top of the editor:
- Keys PLAY or Keys EDIT says what the computer keyboard does. In PLAY the keys play the instrument, as they do on the panel. Click in the editor, or press Ctrl+E (⌘+E on a Mac), and it reads EDIT: the keys edit and play nothing, so a stray letter never changes a view while you mean to play. Esc gives the keys back.
- Follow the panel moves the editor to whatever the panel shows. Open on the panel does the reverse: choosing a block or a parameter in the editor opens its page on the panel.
- Undo and Redo cover what you do in the editor and what you turn on the panel, alike.
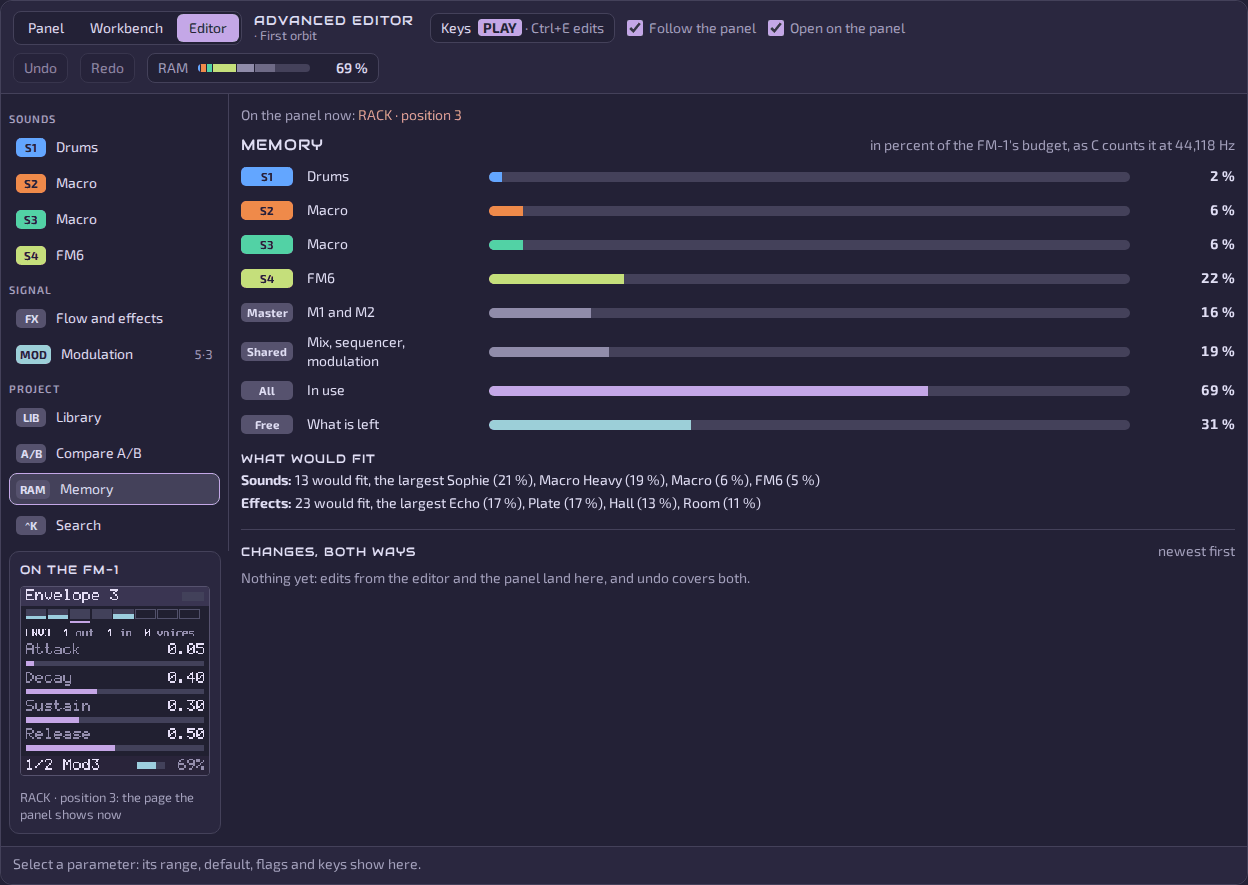
- RAM is how much of the FM-1’s memory the project uses, as a percentage. Click it for the share of each part. Nothing the editor lets you do can go past 100 %.
15.2 The outline, the Flow and the sounds
Status:In the simulator
The outline on the left lists the four sounds, Flow and effects, Modulation, and under Project the Library, Compare A/B, Memory and Search. Click one to open it.
Flow and effects draws the signal path: each sound’s engine into its two inserts, the four sounds into the mix, and on into the two master effects. Every block shows its name, a level bar and, when cables end on it, how many (2 cables, or 1 cable, 1 refused when one of them does not run). Click a block and its values open below it. A long press on a block, a right click or the keyboard’s menu key opens a small menu for it: its page, another engine or effect, Swap with…, Export…, Save to my library and Copy a link.
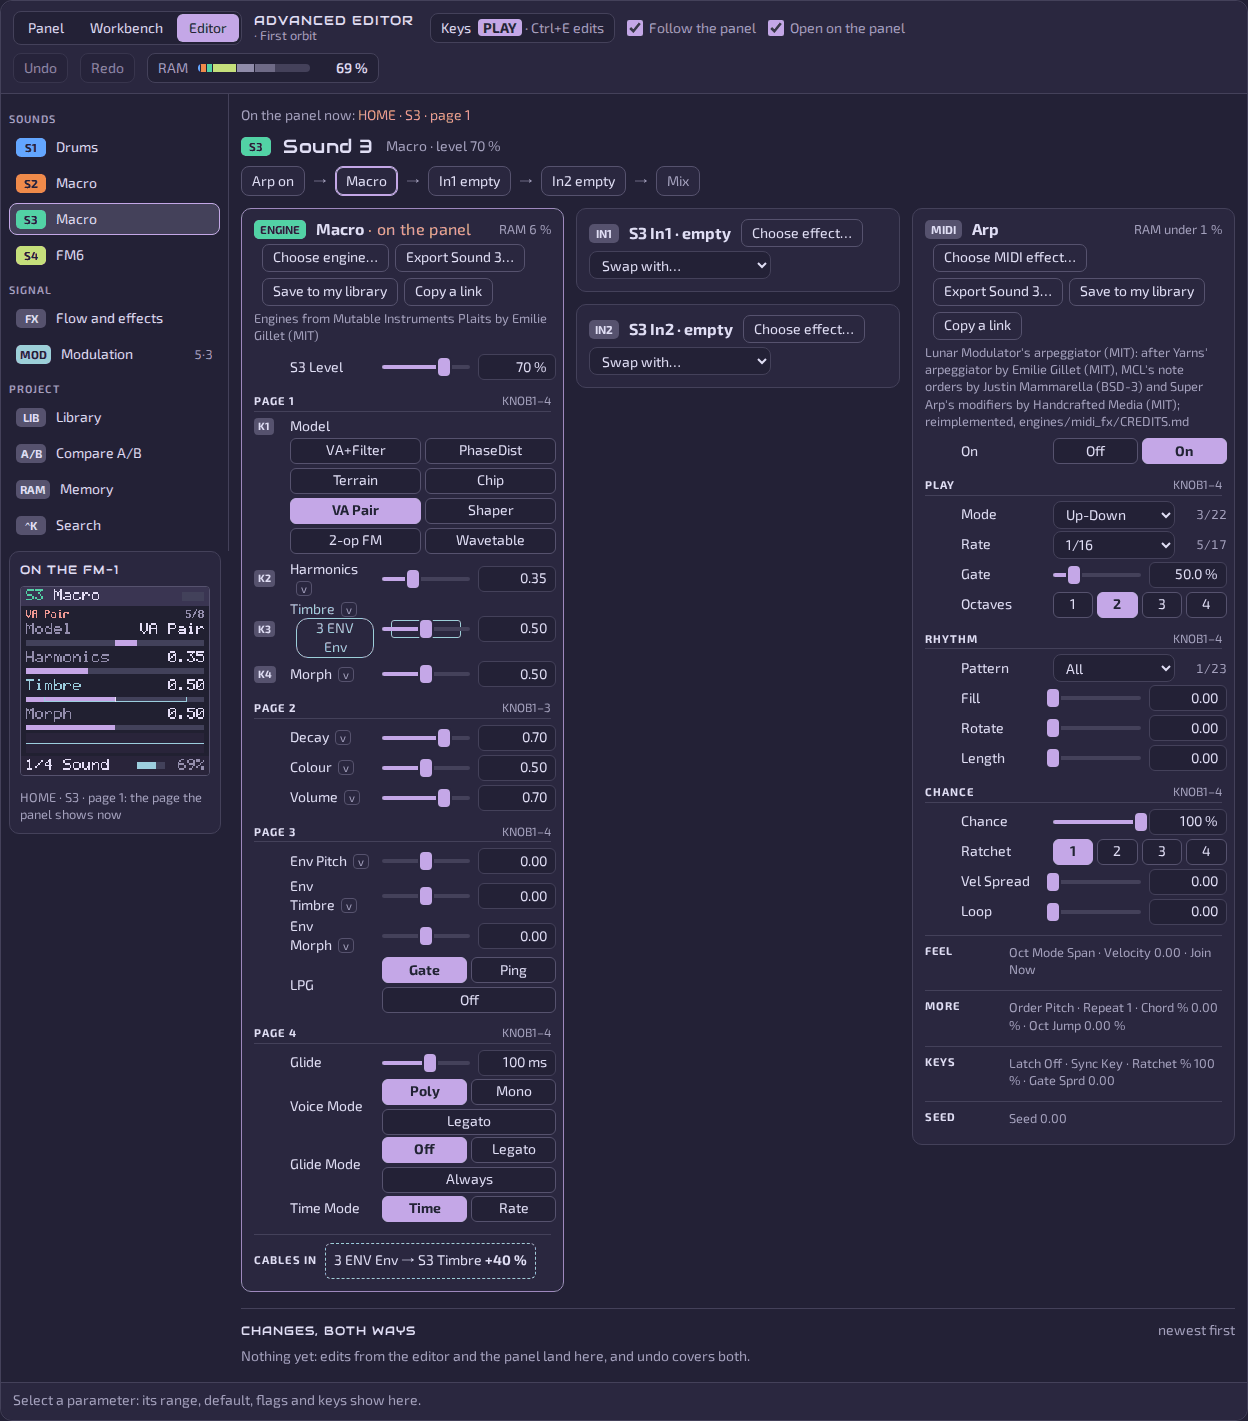
A sound opens as a page of sliders grouped by the panel’s own pages. A slider moves with the mouse or the arrow keys. Shift moves it ten steps, Alt a tenth of a step, Home and End go to the ends, and Enter lets you type a value. D puts a value back to its default. A small v on a parameter means a cable can move it for each note on its own (see Modulation).
Where a cable moves a value, you see it on the slider as the screen shows it: the parameter’s name turns the modulation colour, a chip beside it names the cable’s source (click it to open the cable), a bracket shows how far the cables can move the value either side of where you set it, and a white tick shows where it is now. A per-voice cable draws one tick for each sounding note. The slider says the same in words to a screen reader: “Cutoff, 420 hertz, modulated by 1 LFO Out, plus 35 percent”. C on a parameter that takes a cable makes one into it, from the first module’s output, and opens it; on one that does not, the editor says so in the instrument’s words.
15.3 Choosing and moving effects
Status:In the simulator
Choose engine…, Choose effect…, Choose MIDI effect… and Choose module… list every choice with the memory the project would use with it, as a percentage. A choice that does not fit says why, in the same words the panel uses, and cannot be picked.
To move an effect, drag it onto another effect slot, of any sound or the master. The two swap places, with their cables. Before you let go, the slot under it says whether the swap fits and what the memory would be. With the keyboard, Space picks the effect up, the arrow keys choose where, Space drops it and Esc cancels; Swap with… in an effect’s box does the same from a list. Modules in the rack move the same way.
Effects show what goes in and what comes out. Comp, the output limiter and Squash also show how much they are turning the sound down, as a thin bar and GR 4.8 dB beside the Out meter, while they are doing it.
15.4 Modulation: the table
Status:In the simulator
Modulation shows the rack and its cables. The default view is the table, the one to use with a keyboard or a screen reader. The rack is eight cards, each with its output drawn live. Under it, the matrix lists every cable: where it comes from, its VIA, where it goes, its amount, its live value, and, if it does not run, why.
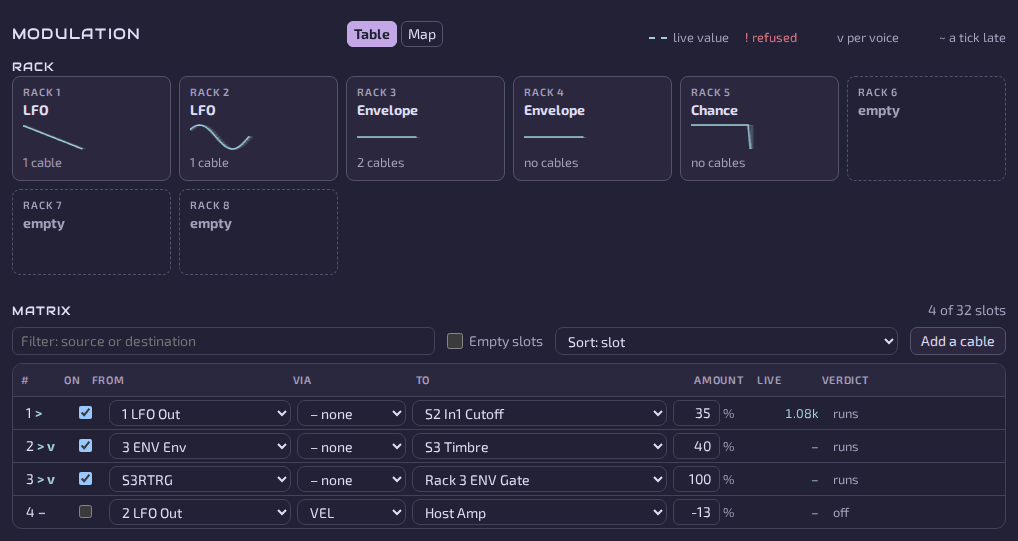
A cable’s number opens all of its settings: on or off, source, VIA, destination, amount, offset, polarity, curve and per voice. Remove deletes it. Add a cable puts a new one in the first free slot. A mark by the number says more at a glance, in the instrument’s own characters: > runs, v is per voice, ~ runs a tick late, ! does not run, and – is switched off. A cable that does not run is kept as you wrote it, with the reason beside it, and runs once the reason is put right; where the reason has a remedy, a button offers it (Make it global for a per-voice cable aimed at an effect), and the instrument judges the result. A cable marked ~ closes a loop: the cables run in rack order, so a cable that goes back up the rack reads its source from the tick before. Its settings say which modules the loop passes through. Curves are drawn, each on its button and the chosen one larger, and a per-voice cable shows each sounding note’s own value.
The amount is a percentage of the destination’s range. Type a number and press Enter, or use ↑ and ↓ (Shift for ten).
15.5 Modulation: the Map
Status:In the simulator
Map, at the top right of Modulation, draws the same cables as a patch bay. It is a second view of the same thirty-two slots: change a cable in the table and the Map follows, and the other way round.
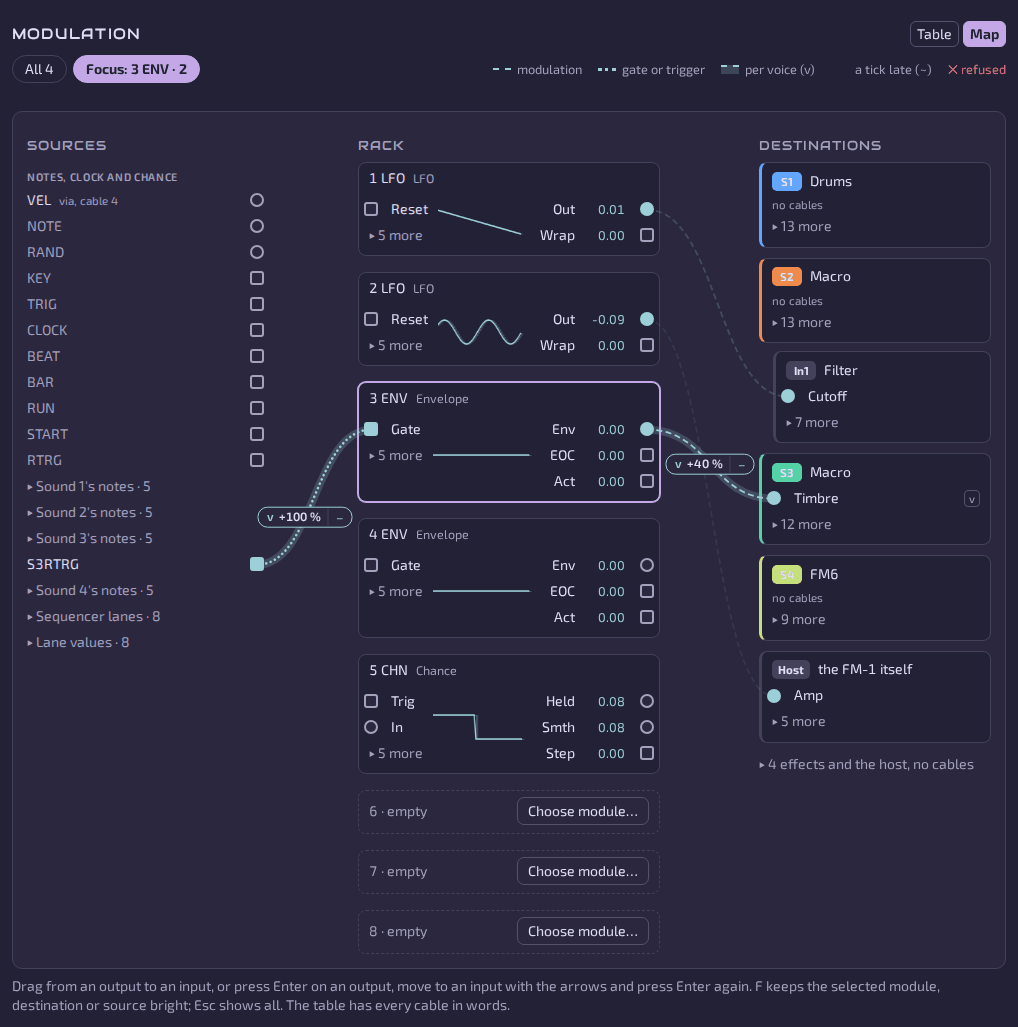
The Map has three columns. Sources on the left are everything a cable can start from: the notes and the clock, the sequencer’s lanes, and each sound’s own notes. Sources in use are bright; the groups you are not using are folded under a line such as Sound 1’s notes · 5. The Rack in the middle shows its modules with their inputs on the left and their outputs on the right, each output with its live value. Destinations on the right are the sounds, their effects, the master and the host, listing the parameters that already have a cable and, behind 13 more, the rest.
A cable runs from a round or square jack on an output to one on an input. Round jacks carry a continuous signal. Square ones carry gates and triggers. Cables are drawn in the lanes between the columns and in a band above the rack; they never cross a module or a label.
| The cable | Means |
|---|---|
| Dashed line | A modulation signal. The jacks at its ends are lit |
| Dotted line | A gate or trigger |
| Dashed line over a pale band, a v on its pill | A per-voice cable: each sounding note has its own value |
| Line in the refusal colour, ending in a cross | A cable that does not run. Its pill has a ! |
| Any line, a ~ on its pill | A cable that runs a tick late. A tick late above the Map brings these forward |
| Thicker line in the selection colour | The cable chosen in the table below, or the one you clicked |
A pill beside a cable says its amount, and while the cable has something to say, its live value. To keep the Map readable, pills appear only for the selected cable, for the cables in focus, and for the refused ones.
15.5.1 Focus
Thirty-two cables are too many to read at once. Click a module’s name, a destination’s heading or a source’s name and the Map goes into focus: that block’s cables stay bright and carry their amounts; every other cable dims and loses its label. F does the same for the jack or block that has the keys, and again to leave. Esc, or All above the Map, shows everything again. Refused brings forward the cables that do not run, and A tick late the ones that close a loop.
15.5.2 Making a cable
Drag from an output jack to an input jack. While the cable is in your hand every destination opens, so any parameter can be a target. Over an input, the Map asks the instrument what would happen and says so in the line above the Map: Runs, or why not, in the refusal’s own words. Let go to drop the cable. It goes into the first free slot at 25 % and is selected, so its settings are open under the Map; one Undo takes it away.
Without a mouse: press Enter on an output jack, move between inputs with the arrow keys, and press Enter again to drop the cable. Esc puts it back. There is one tab stop in each column; the arrow keys walk within it, and every jack has a name. Screen readers should use the table, which lists every cable in words.
15.5.3 Room
The Map needs a window about 620 pixels wide for the editor. Below that, as on a phone, the switch is not shown and Modulation stays a table, with each cable as a small card.
15.6 Files, the library and links
Status:In the simulator
Every block takes files. Drop a .lunar sound on a sound, an effects file on
a sound’s effects or on a master slot, a mod rack on the rack, or a whole project
anywhere. Before anything loads, the editor says what the file would do, what it
would replace and what it would bring, and how much memory the project would
use, or why it does not fit. Load goes ahead; nothing changes until you
choose it.
Each box has Export…, which saves that block as a file, Save to my library and Copy a link, a link that opens that block’s file in someone else’s browser. In Chromium you can also drag a sound’s tag in the Flow (S2) to the desktop, and it becomes the sound’s file. The Library lists what you have saved in this browser, with Recent and the examples; load a project from it, or drag a saved sound or effects onto the block it fits, and the block says whether it fits while you hold it there.
Search (Ctrl+K, ⌘+K on a Mac) finds a sound, an effect, a parameter by name (s2 cutoff), a cable or a command. Arrows choose, Enter goes there, Esc closes it. A few signs narrow it: >cutoff is the cables into a Cutoff, lfo> the cables out of an LFO, ! the cables that do not run, ~ the ones a tick late, v the per-voice ones, s2 what belongs to Sound 2, and a unit such as hz the parameters in hertz. They combine (>cutoff !).
A link can open the editor at a place: add ?view=edit&sel=s1 or
?view=edit&sel=s3.in1:Cutoff to the simulator’s address.
15.7 Compare, Memory and Undo
Status:In the simulator
Compare A/B keeps the project, or one sound, as A: choose Keep as A, then edit as you like. X switches between A and what you made, B, and the differences are listed, each with a choice of A or B. Make B from the picks loads B with A’s value in every row you chose from A and B’s in the rest, as one step you can undo, after the instrument has said whether it fits. A and B are kept in this browser, so they are still there after a reload.
Memory shows how much each part takes, as a percentage of what the FM-1 has: each sound with its inserts, the two master effects, and what is shared (the mix, the sequencer and the modulation), then what is in use, what is left, and which sounds and effects would still fit in it.
Undo goes back one change at a time. It covers a slider, a choice of engine or effect, a swap, a module moved, a cable made, edited or removed, and a file loaded. A change from the panel’s knobs is one step too.
15.8 Keys, the keyboard and screen readers
Status:In the simulator
Everything in the editor can be done from the keyboard. Tab moves through the controls, each with a name and a two-pixel ring around it. Sliders say their value in words (“Cutoff, 420 hertz”). The editor announces your changes and any refusal, at most once a second, and never a live value.
Colour is never the only signal: the marks >, v, ~, ! and – come with words, cable styles differ by line as well as colour, and a memory share that does not fit is spelt out as “over”. In forced-colours mode the cables use the system’s colours and keep their dashes. With reduced motion set, nothing flashes or moves apart from the meters, which are information.
15.9 Phones and tablets
Status:In the simulator
On a tablet the outline becomes a narrow rail and the Workbench stacks the panel above the editor. On a phone the switch has two tabs, Panel and Edit. Edit shows the outline as a row of tabs along the top, a small screen, and the modulation matrix as a list of cables with every setting named. Add a cable asks in three steps, with a sheet at the bottom of the screen: where it comes from, where it goes, and how much, with the instrument’s verdict before you make it. A long press on a block opens its menu. The Map is for wider windows.
15.10 Browsers
Status:In the simulator
The editor is tested in Chromium, Firefox and WebKit (the engine of Safari) on a desktop. It needs a browser with audio worklets and workers; the simulator’s own requirements are in chapter 2. Its views are checked with axe-core’s rules at desktop, tablet and phone widths. It has not been tried on a phone or a tablet itself, only at their window sizes, and not with a screen reader itself, only with the accessibility tree a browser builds for one.